【OpenAPI入門】Open APIとは?から導入、運用まで

今回はOpen APIの紹介です。
Open APIとは?
OpenAPI(Swagger)は、APIの仕様を記述するためのフレームワークやツールの一つです。
APIはソフトウェアアプリケーション同士が情報をやり取りするためのインターフェースであり、OpenAPIはそのAPIの仕様書を標準化し、簡単に作成・理解できる形式で提供します。
記述はJSONかYAMLのどちらかで記述を行います。
OpenAPI Specificationとは?
OpenAPI Specification(OAS)はAPIの仕様を定義するための標準的な形式です
スポンサードサーチ
OpenAPIの使い方
OpenAPIの使い方は以下のことができます。
- APIの設計
- APIのドキュメンテーション
- クライアントおよびサーバーコードの生成
- モックサーバーの作成
APIの設計
APIの設計は先ほど軽く触れた「OpenAPI Specificationの作成」にあたります。
OpenAPI Specification(OAS)はYAMLまたはJSON形式で作成します。
この仕様は、APIのエンドポイント、データ型、認証などを定義します。
APIのドキュメンテーション
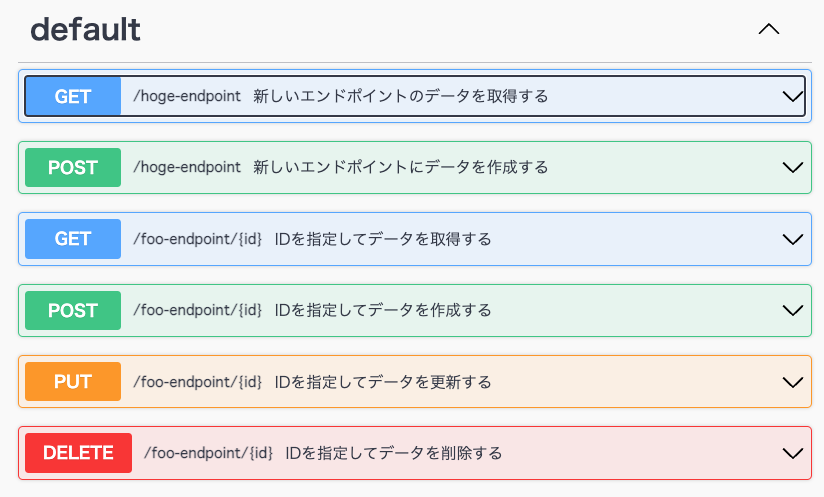
OpenAPI Specificationを使用して自動的に生成されたSwagger UIを提供することができます。
これにより、開発者はAPIのエンドポイント、リクエストおよびレスポンスの詳細を視覚的に確認できます。
クライアントおよびサーバーコードの生成
OpenAPI Generatorは、OpenAPI Specificationからクライアントおよびサーバーコードを生成するための強力なツールです。使用するプログラミング言語とフレームワークを選択し、コマンドラインまたはオンラインジェネレータを使用してコードを生成できます。
openapi-generator-cli generateモックサーバーの作成
OpenAPI Specificationからモックサーバーを作成し、開発者が実際のAPIの完成前にクライアントアプリケーションをテストすることができます。
swagger-mock-serverAppの作成
それでは早速、OpenAPI を使ったアプリケーションを作っていきましょう。
今回はnode環境で行います。
Appの作成とyamlファイルを作成します。

スポンサードサーチ
OpenAPI Specificationの作成
YAMLファイルまたはJSONファイルを作成して以下必要な記述をおこなっていきます。
openapi: 3.0.0
info:
title: APIのタイトル
version: 1.0.0
servers:
- url: http://api.example.com
description: 本番環境
- url: http://localhost:3000/{version}
description: ローカル環境
variables:
version:
default: v1
- url: http://dev-api.example.com/{version}
description: 開発環境
variables:
version:
enum:
- v1
- v2
default: v1
paths:
/hoge-endpoint:
get:
operationId: hoge#get
summary: 新しいエンドポイントのデータを取得する
responses:
'200':
description: 成功したレスポンス
content:
application/json:
schema:
$ref: '#/components/schemas/hogeSchema'
post:
operationId: hoge#post
summary: 新しいエンドポイントにデータを作成する
requestBody:
required: true
content:
application/json:
schema:
$ref: '#/components/schemas/hogeSchema'
responses:
'201':
description: リソースが正常に作成されました
/foo-endpoint/{id}:
get:
operationId: foo#get
summary: IDを指定してデータを取得する
parameters:
- name: id
in: path
description: 取得するデータのID
required: true
schema:
type: string
responses:
'200':
description: 成功したレスポンス
content:
application/json:
example:
key1: value1
key2: value2
post:
operationId: foo#post
summary: IDを指定してデータを作成する
parameters:
- name: id
in: path
description: 作成するデータのID
required: true
schema:
type: string
requestBody:
required: true
content:
application/json:
schema:
$ref: '#/components/schemas/hogeSchema'
responses:
'201':
description: リソースが正常に作成されました
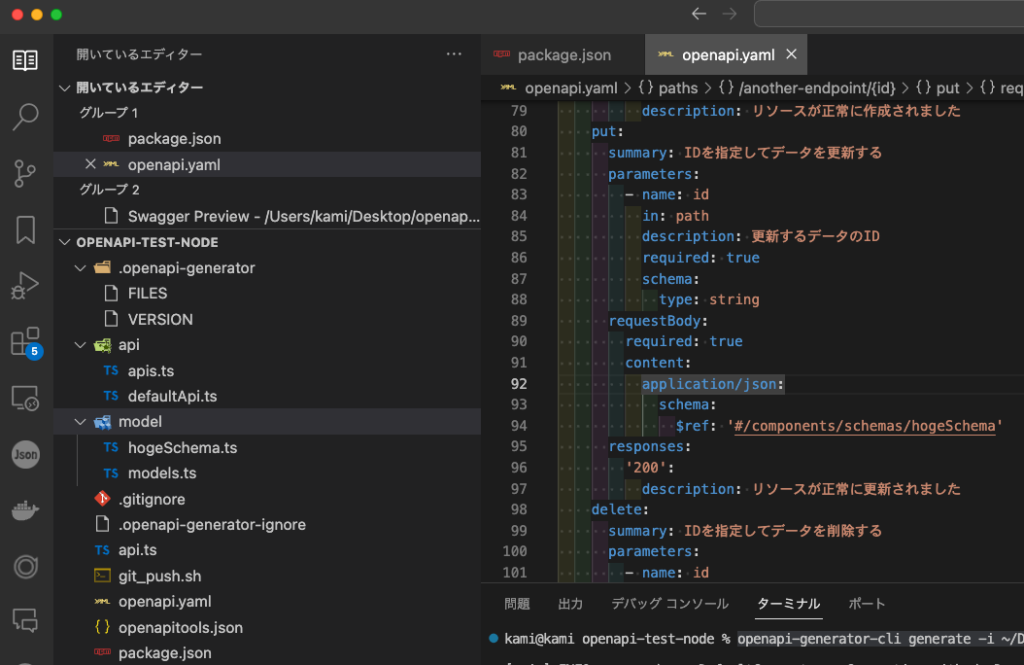
put:
operationId: foo#put
summary: IDを指定してデータを更新する
parameters:
- name: id
in: path
description: 更新するデータのID
required: true
schema:
type: string
requestBody:
required: true
content:
application/json:
schema:
$ref: '#/components/schemas/hogeSchema'
responses:
'200':
description: リソースが正常に更新されました
delete:
operationId: foo#delete
summary: IDを指定してデータを削除する
parameters:
- name: id
in: path
description: 削除するデータのID
required: true
schema:
type: string
responses:
'204':
description: リソースが正常に削除されました
components:
schemas:
hogeSchema:
type: object
properties:
key1:
type: string
key2:
type: stringopenapi
OpenAPI Specificationのバージョンです。
openapi: 3.0.0
スポンサードサーチ
info
APIの基本情報をを記述していきます。
info:
  title: APIのtitle
  version: 1.0.0
title
APIのタイトルです。
version
APIのバージョンです。
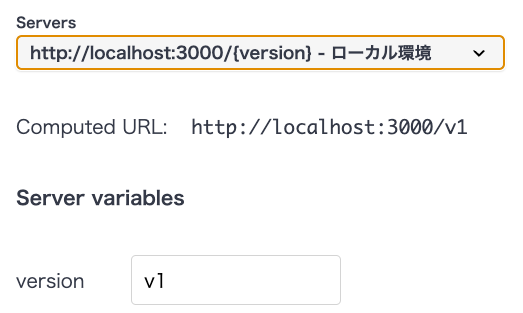
servers
serversはAPIのエンドポイントURLを指定します。
各サーバーには url と description があります。
servers:
  - url: http://api.example.com
    description: 本番環境
  - url: http://localhost:3000/{version}
    description: ローカル環境
    variables:
      version:
        default: v1
  - url: http://dev-api.example.com/{version}
    description: 開発環境
    variables:
      version:
        enum:
          - v1
          - v2
        default: v1
description
各サーバーの説明です。
variables
パスやサーバーURLの中で変数を使用する場合、その変数の定義を記述します。
version
versionは変数の名前で、後で variables セクションで参照されます。
変数なので、{id}などで使っても構いません。
enum
変数が取ることができる値のリストを指定します。
    variables:
      version:
        enum:
          - v1
          - v2
        default: v1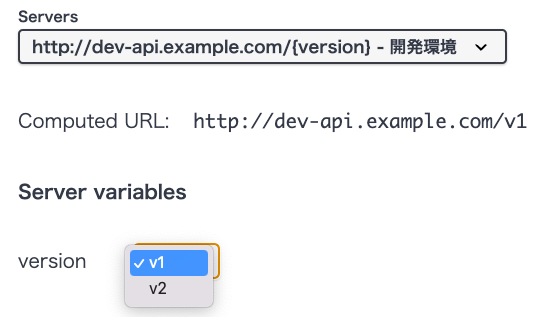
default
変数のデフォルト値を指定します。
    variables:
      version:
        default: v1
paths
エンドポイント毎に関連するメソッドの定義します。
paths:
  /hoge-endpoint:
    get:
      summary: 新しいエンドポイントのデータを取得する
      responses:
        '200':
          description: 成功したレスポンス
          content:
            application/json:
              schema:
                $ref: '#/components/schemas/hogeSchema'
/endpoint
エンドポイントのパスを指定します。
get
GETメソッドに対する操作を定義します。
他にもpost, put, deleteなどのHTTPメソッドに対する操作が同様に定義されます。
  /foo-endpoint/{id}:
    get:
      summary: IDを指定してデータを取得する
      parameters:
        - name: id
          in: path
          description: 取得するデータのID
          required: true
          schema:
            type: string
      responses:
        '200':
          description: 成功したレスポンス
          content:
            application/json:
              example:
                key1: value1
                key2: value2
post
    post:
      summary: 新しいエンドポイントにデータを作成する
      requestBody:
        required: true
        content:
          application/json:
            schema:
              $ref: '#/components/schemas/hogeSchema'
      responses:
        '201':
          description: リソースが正常に作成されました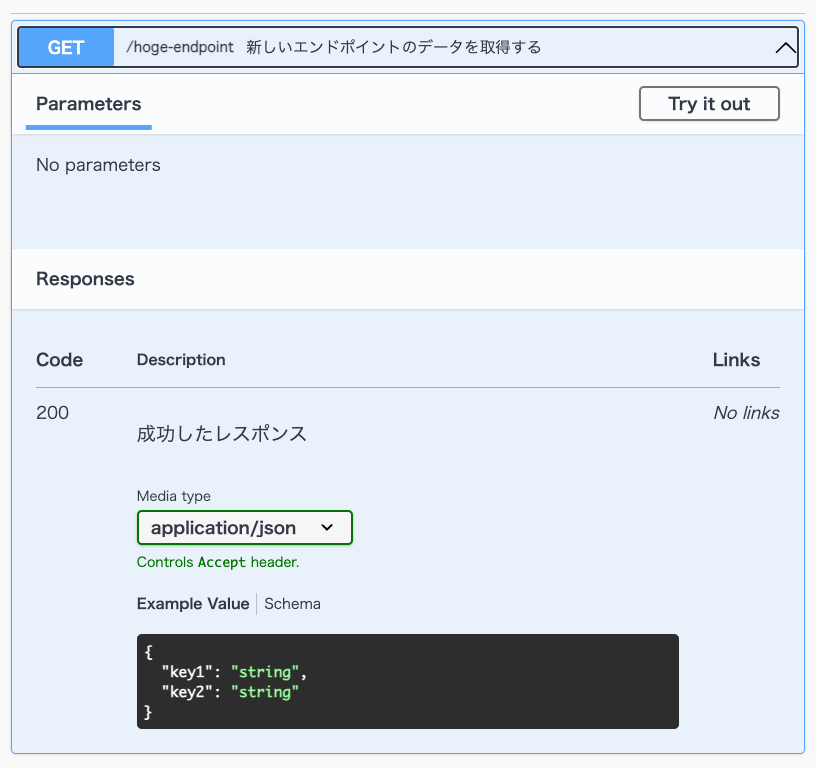
operationId
perationIdは、APIドキュメントや仕様において個々のAPI操作(エンドポイント)を一意に識別するための識別子として使用されます。
砕いて言うと「APIのID」です。
フロントからはエンドポイントでAPIを叩きますが、operationIdを元に処理とのリンクを行います。
operationId名 => [\App\Http\Controllers\モデル\コントローラークラス名::class, 'メソッド名'],summary
エンドポイントの簡潔な説明。
  /foo-endpoint/{id}:
    get:
      summary: IDを指定してデータを取得する
parameters
parametersは、APIエンドポイントに渡されるクエリパラメータ、パスパラメータ、ヘッダー、またはクッキーの情報を定義します。それぞれのパラメータはその場所、型、必須かどうかなどを指定します。
name: パラメーターの名前を指定します。この場合、idがパラメーターの名前です。in: パラメーターがどのような方法で渡されるかを指定します。この場合、pathとなっており、パス内の一部として渡されることを示しています。description: パラメーターに関する説明を提供します。この場合、idパラメーターが取得するデータのIDを表すことが説明されています。required: パラメーターが必須かどうかを示します。trueの場合、クライアントがこのエンドポイントを呼び出す際に、idパラメーターが必要です。schema: パラメーターのデータ型や制約を指定するためのセクションです。この例では、type: stringと指定されており、idパラメーターが文字列型であることを示しています。
    post:
      summary: IDを指定してデータを作成する
      parameters:
        - name: id
          in: path
          description: 作成するデータのID
          required: true
          schema:
            type: string
responses
responsesは、APIエンドポイントが返す可能性のあるHTTPレスポンスを定義します。
各レスポンスはステータスコードで識別され、説明や具体的な内容(ボディ、ヘッダーなど)を含むことができます。
200OK: 成功した場合のレスポンスです。201Created: POSTリクエストが成功した場合のレスポンスです。- 400 Bad Request: リクエストが不正。
- 401 Unauthorized: 認証が必要であるが、認証情報が提供されていないか無効。
- 402 Payment Required: 支払いが必要(ほとんど使用されない)。
- 403 Forbidden: アクセス権がなく、アクセスが禁止されている。
- 500 Internal Server Error: サーバー内部のエラー。
      responses:
        '200':
          description: 成功したレスポンス
          content:
            application/json:
              example:
                key1: value1
                key2: value2
description
レスポンスの詳細な説明です。
requestBody
openAPI Specificationにおいて、HTTPリクエストのボディに含まれるデータの構造を定義するための要素です。
具体的には、APIエンドポイントが受け入れるリクエストボディの形式や構造を指定します。
- POST
- PUT
- PATCH
リクエストのペイロードの内容とその形式(JSON、XMLなど)を記述します。
required
リクエストボディが必須かどうかを指定します。true の場合、リクエストを行う際にボディが必要です。
content
メディアタイプとその内容に関する情報を指定します。
上記の例では、application/json メディアタイプに関する情報を提供しています。
application/json
JSON形式のレスポンスを定義します。
schema
リクエストボディのスキーマを指定します。
この例では、hogeSchema という名前で定義されたオブジェクトスキーマが使用されています。$ref は外部のスキーマを参照するためのもので、#/components/schemas/ で始まるパスは、同一ドキュメント内のコンポーネント内のスキーマを参照します。
schema:
        $ref: '#/components/schemas/hogeSchema'
components
データ構造を参照する
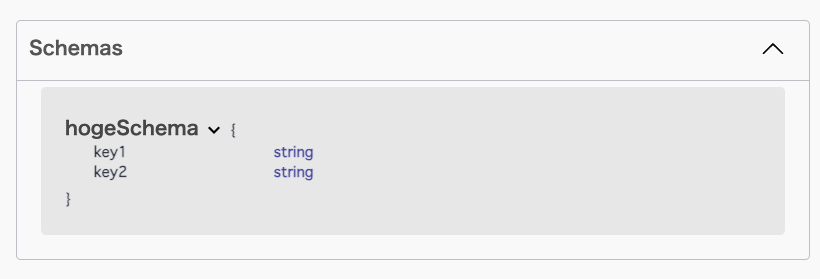
schemas
schemas内にスキーマーを記述します。
直後にスキーマー名を記述します。
schemas:
    hogeSchema:
type
スキーマの種類を指定しています。
type: objectproperties
スキーマのプロパティ(キーと型)を指定します。
properties:
        key1:
          type: string
        key2:
          type: string
openapi-generator-cliをインストール
「openapi-generator-cli」をインストールします。
npm install -g openapi-generator-cliバージョンが返ってくれば成功です。
「openapi-generator-cli」が正常にインストールされ、実行することができます。
openapi-generator-cli version
OpenAPI generator起動

OpenAPI generatorをコマンドを叩いて起動をします。
openapi-generator-cli generate -i OpenAPI Specificationファイルのパス -g 生成するコードの言語やフレームワーク -o 生成されたコードの出力先ディレクトリのパス- openapi-generator-cli:OpenAPI Generatorコマンドラインインターフェース(CLI)
- generate:: コード生成
- -iオプション:OpenAPI Specificationファイルのパス
- -gオプション:生成するコードの言語やフレームワーク
- -oオプション:生成されたコードの出力先ディレクトリのパス
-gオプションの例を紹介します。
listコマンドで一覧を取得できます。
openapi-generator-cli listクライアントジェネレータ
- JavaScript:
javascript - TypeScript:
typescript,typescript-angular,typescript-axios,typescript-node - Python:
python - Go:
go - Ruby:
ruby - PHP:
php - Java:
java - C#:
csharp
サーバージェネレータ
- Node.js (Express):
nodejs-express-server - Java (Spring):
spring - Python (Flask):
python-flask - Ruby (Sinatra):
ruby-sinatra - PHP (Laravel):
php-laravel - Go (Echo):
go-echo-server - TypeScript (Node.js):
typescript-node
ドキュメンテーションジェネレータ
- HTML:
html - AsciiDoc:
asciidoc - Markdown:
markdown(beta)
スキーマジェネレータ
- GraphQL Schema:
graphql-schema - MySQL Schema:
mysql-schema - Protobuf Schema:
protobuf-schema(beta)
設定ジェネレータ
- Apache2:
apache2

今回はNodeのTypeScript環境で実行します。
openapi-generator-cli generate -i ~/Desktop/openapi-test-node/openapi.yaml -g typescript-node -o ~/Desktop/openapi-test-node
実行結果がこちらです。
処理が成功すると、各ファイルが生成されます。
kami@kami openapi-test-node % openapi-generator-cli generate -i ~/Desktop/openapi-test-node/openapi.yaml -g typescript-node -o ~/Desktop/openapi-test-node

[main] INFO  o.o.codegen.DefaultGenerator - Generating with dryRun=false
[main] INFO  o.o.codegen.DefaultGenerator - OpenAPI Generator: typescript-node (client)
[main] INFO  o.o.codegen.DefaultGenerator - Generator 'typescript-node' is considered stable.
[main] INFO  o.o.c.l.AbstractTypeScriptClientCodegen - Hint: Environment variable 'TS_POST_PROCESS_FILE' (optional) not defined. E.g. to format the source code, please try 'export TS_POST_PROCESS_FILE="/usr/local/bin/prettier --write"' (Linux/Mac)
[main] INFO  o.o.c.l.AbstractTypeScriptClientCodegen - Note: To enable file post-processing, 'enablePostProcessFile' must be set to `true` (--enable-post-process-file for CLI).
[main] WARN  o.o.codegen.DefaultCodegen - The value (generator's option) must be either boolean or string. Default to `false`.
[main] INFO  o.o.codegen.TemplateManager - writing file /Users/kami/Desktop/openapi-test-node/model/./hogeSchema.ts
[main] WARN  o.o.codegen.DefaultCodegen - Empty operationId found for path: get /new-endpoint. Renamed to auto-generated operationId: new_endpointGet
[main] WARN  o.o.codegen.DefaultCodegen - Empty operationId found for path: post /new-endpoint. Renamed to auto-generated operationId: new_endpointPost
[main] WARN  o.o.codegen.DefaultCodegen - Empty operationId found for path: get /another-endpoint/{id}. Renamed to auto-generated operationId: another_endpointIdGet
[main] WARN  o.o.codegen.DefaultCodegen - Empty operationId found for path: put /another-endpoint/{id}. Renamed to auto-generated operationId: another_endpointIdPut
[main] WARN  o.o.codegen.DefaultCodegen - Empty operationId found for path: post /another-endpoint/{id}. Renamed to auto-generated operationId: another_endpointIdPost
[main] WARN  o.o.codegen.DefaultCodegen - Empty operationId found for path: delete /another-endpoint/{id}. Renamed to auto-generated operationId: another_endpointIdDelete
[main] INFO  o.o.codegen.TemplateManager - writing file /Users/kami/Desktop/openapi-test-node/api/defaultApi.ts
[main] INFO  o.o.codegen.TemplateManager - writing file /Users/kami/Desktop/openapi-test-node/model/models.ts
[main] INFO  o.o.codegen.TemplateManager - writing file /Users/kami/Desktop/openapi-test-node/api/apis.ts
[main] INFO  o.o.codegen.TemplateManager - writing file /Users/kami/Desktop/openapi-test-node/api.ts
[main] INFO  o.o.codegen.TemplateManager - writing file /Users/kami/Desktop/openapi-test-node/git_push.sh
[main] INFO  o.o.codegen.TemplateManager - writing file /Users/kami/Desktop/openapi-test-node/.gitignore
[main] INFO  o.o.codegen.TemplateManager - Skipped /Users/kami/Desktop/openapi-test-node/.openapi-generator-ignore (Skipped by supportingFiles options supplied by user.)
[main] INFO  o.o.codegen.TemplateManager - writing file /Users/kami/Desktop/openapi-test-node/.openapi-generator/VERSION
[main] INFO  o.o.codegen.TemplateManager - writing file /Users/kami/Desktop/openapi-test-node/.openapi-generator/FILES
################################################################################
# Thanks for using OpenAPI Generator.                                          #
# Please consider donation to help us maintain this project 🙏                 #
# https://opencollective.com/openapi_generator/donate                          #
################################################################################
Swagger Mock Serverを使用する
今回はvscodeの拡張機能の「Swagger Viewer」を使っていきます。
yamlファイルを書いて「Shift + option + p」でyamlで書いた記述をuiとして閲覧することができます。

APIのレスポンス結果を見たりすることができます。
「Try it out」を押下することでidを入力することができます。
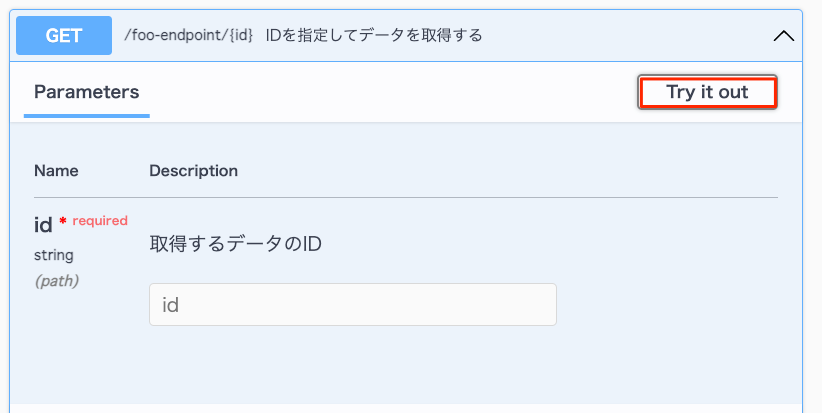
「id」を入力して「Execte」で実行します。
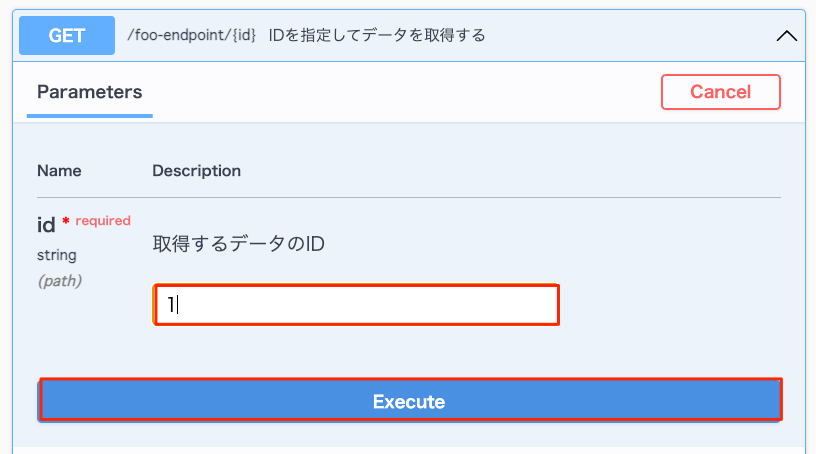
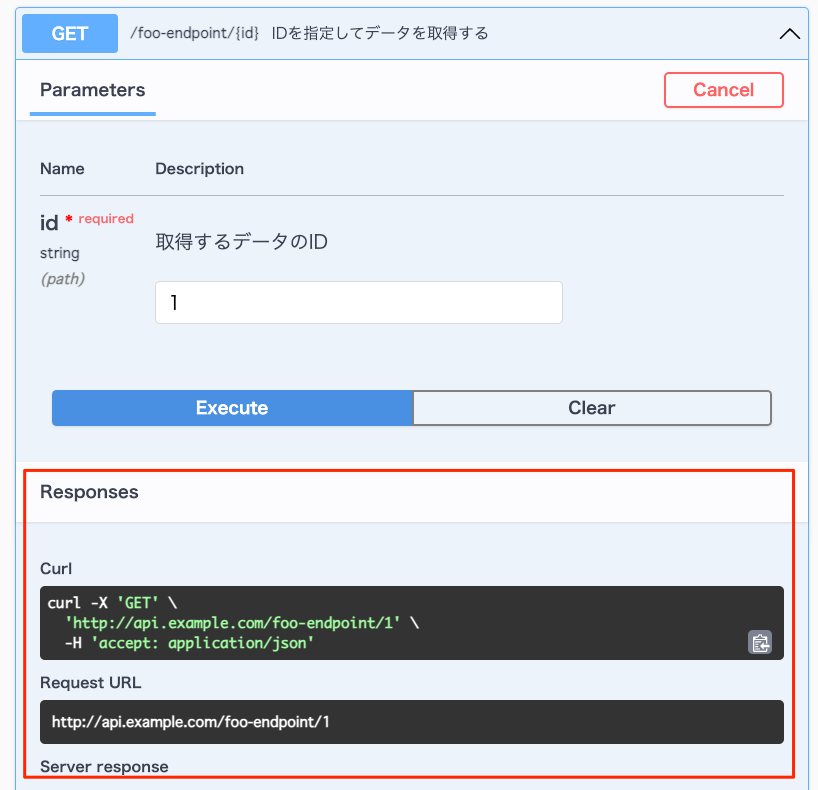
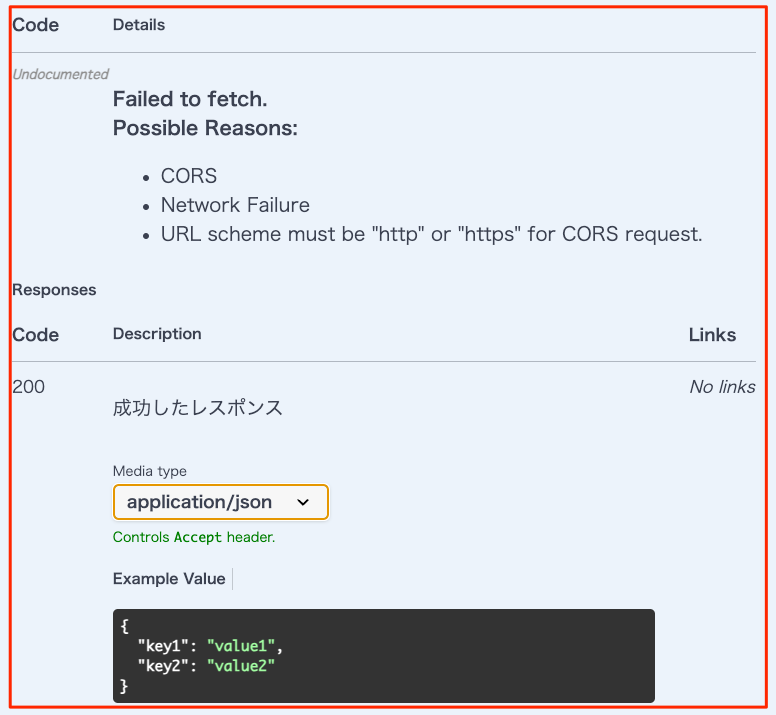
「Response」が返り値になります。
cliでSwagger Mock Serverをを使用する
使用するにはまずはSwagger Mock Serverをインストールします。
もし、cliでやりたい場合はinstallして細かくは調べてみてください。
npm install -g swagger-mock-server