【Vue.js入門】Vueのファイル構造について学ぼう


kamiです。
今回はVueのファイル構造の紹介です。
ファイル構造
vue-project/
├── public/
│   ├── index.html
│   └── favicon.ico
├── src/
│   ├── assets/
│   │   └── logo.png
│   ├── components/
│   │   └── HelloWorld.vue
│   ├── views/
│   │   └── Home.vue
│   ├── App.vue
│   └── main.js
├── tests/
├── .gitignore
├── babel.config.js
├── package.json
├── README.md
├── vue.config.js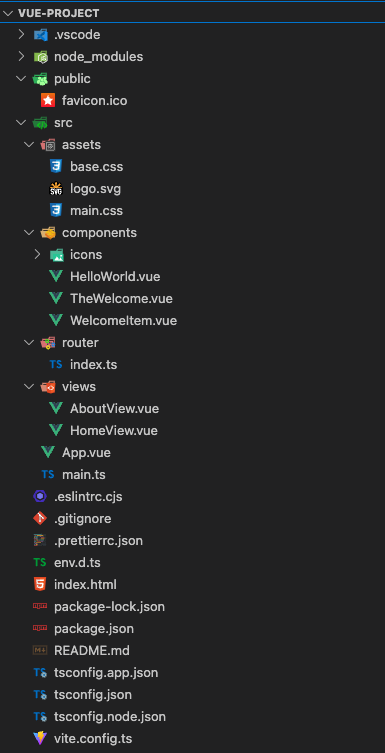

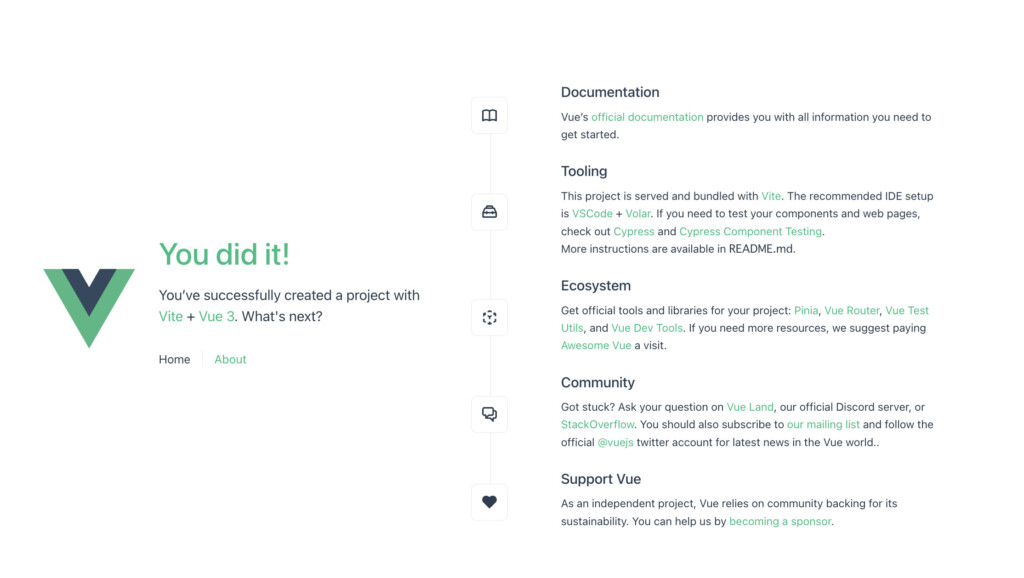
localで起動した場合はこのような画面が表示されます。
public
publicは静的ファイルがここに配置されます。index.html ファイルは、アプリケーションのエントリーポイントとなります。
「id="app"」は「index.html」に記述されています。
<!DOCTYPE html>
<html lang="en">
  <head>
    <meta charset="UTF-8">
    <link rel="icon" href="/favicon.ico">
    <meta name="viewport" content="width=device-width, initial-scale=1.0">
    <title>Vite App</title>
  </head>
  <body>
    <div id="app"></div>
    <script type="module" src="/src/main.ts"></script>
  </body>
</html>
スポンサードサーチ
src
アプリケーションのソースコードがsrcにあります。
assets
「css」や「img」が「assets」配下に置かれます。
components
Vueコンポーネントは「components」は以下に置かれます。
以下、ファイルのについても説明を軽くします。
HelloWorld.vue
Vue.jsの新しいプロジェクトを作成すると、HelloWorld.vue というコンポーネントが最初から用意されています。
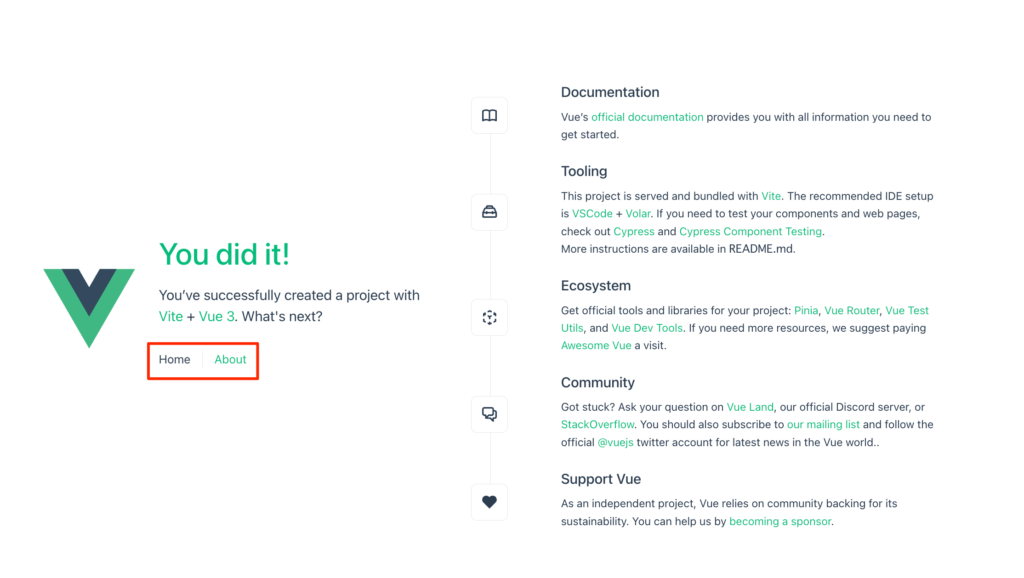
HelloWorld.vueは画面左側に表示されています。
<script setup lang="ts">
defineProps<{
  msg: string
}>()
</script>

<template>
  <div class="greetings">
    <h1 class="green">{{ msg }}</h1>
    <h3>
      You’ve successfully created a project with
      <a href="https://vitejs.dev/" target="_blank" rel="noopener">Vite</a> +
      <a href="https://vuejs.org/" target="_blank" rel="noopener">Vue 3</a>. What's next?
    </h3>
  </div>
</template>
TheWelcome.vue
TheWelcome.vueは画面右側に表示されています。
WelcomeItemコンポーネントを使ってコーディングをしています。
<script setup lang="ts">
import WelcomeItem from './WelcomeItem.vue'
import DocumentationIcon from './icons/IconDocumentation.vue'
import ToolingIcon from './icons/IconTooling.vue'
import EcosystemIcon from './icons/IconEcosystem.vue'
import CommunityIcon from './icons/IconCommunity.vue'
import SupportIcon from './icons/IconSupport.vue'
</script>

<template>
  <WelcomeItem>
    <template #icon>
      <DocumentationIcon />
    </template>
    <template #heading>Documentation</template>

    Vue’s
    <a href="https://vuejs.org/" target="_blank" rel="noopener">official documentation</a>
    provides you with all information you need to get started.
  </WelcomeItem>

  <WelcomeItem>
    <template #icon>
      <ToolingIcon />
    </template>
    <template #heading>Tooling</template>

    This project is served and bundled with
    <a href="https://vitejs.dev/guide/features.html" target="_blank" rel="noopener">Vite</a>. The
    recommended IDE setup is
    <a href="https://code.visualstudio.com/" target="_blank" rel="noopener">VSCode</a> +
    <a href="https://github.com/johnsoncodehk/volar" target="_blank" rel="noopener">Volar</a>. If
    you need to test your components and web pages, check out
    <a href="https://www.cypress.io/" target="_blank" rel="noopener">Cypress</a> and
    <a href="https://on.cypress.io/component" target="_blank" rel="noopener"
      >Cypress Component Testing</a
    >.

    <br />

    More instructions are available in <code>README.md</code>.
  </WelcomeItem>

  <WelcomeItem>
    <template #icon>
      <EcosystemIcon />
    </template>
    <template #heading>Ecosystem</template>

    Get official tools and libraries for your project:
    <a href="https://pinia.vuejs.org/" target="_blank" rel="noopener">Pinia</a>,
    <a href="https://router.vuejs.org/" target="_blank" rel="noopener">Vue Router</a>,
    <a href="https://test-utils.vuejs.org/" target="_blank" rel="noopener">Vue Test Utils</a>, and
    <a href="https://github.com/vuejs/devtools" target="_blank" rel="noopener">Vue Dev Tools</a>. If
    you need more resources, we suggest paying
    <a href="https://github.com/vuejs/awesome-vue" target="_blank" rel="noopener">Awesome Vue</a>
    a visit.
  </WelcomeItem>

  <WelcomeItem>
    <template #icon>
      <CommunityIcon />
    </template>
    <template #heading>Community</template>
    Got stuck? Ask your question on
    <a href="https://chat.vuejs.org" target="_blank" rel="noopener">Vue Land</a>, our official
    Discord server, or
    <a href="https://stackoverflow.com/questions/tagged/vue.js" target="_blank" rel="noopener"
      >StackOverflow</a
    >. You should also subscribe to
    <a href="https://news.vuejs.org" target="_blank" rel="noopener">our mailing list</a> and follow
    the official
    <a href="https://twitter.com/vuejs" target="_blank" rel="noopener">@vuejs</a>
    twitter account for latest news in the Vue world..
  </WelcomeItem>

  <WelcomeItem>
    <template #icon>
      <SupportIcon />
    </template>
    <template #heading>Support Vue</template>

    As an independent project, Vue relies on community backing for its sustainability. You can help
    us by
    <a href="https://vuejs.org/sponsor/" target="_blank" rel="noopener">becoming a sponsor</a>.
  </WelcomeItem>
</template>
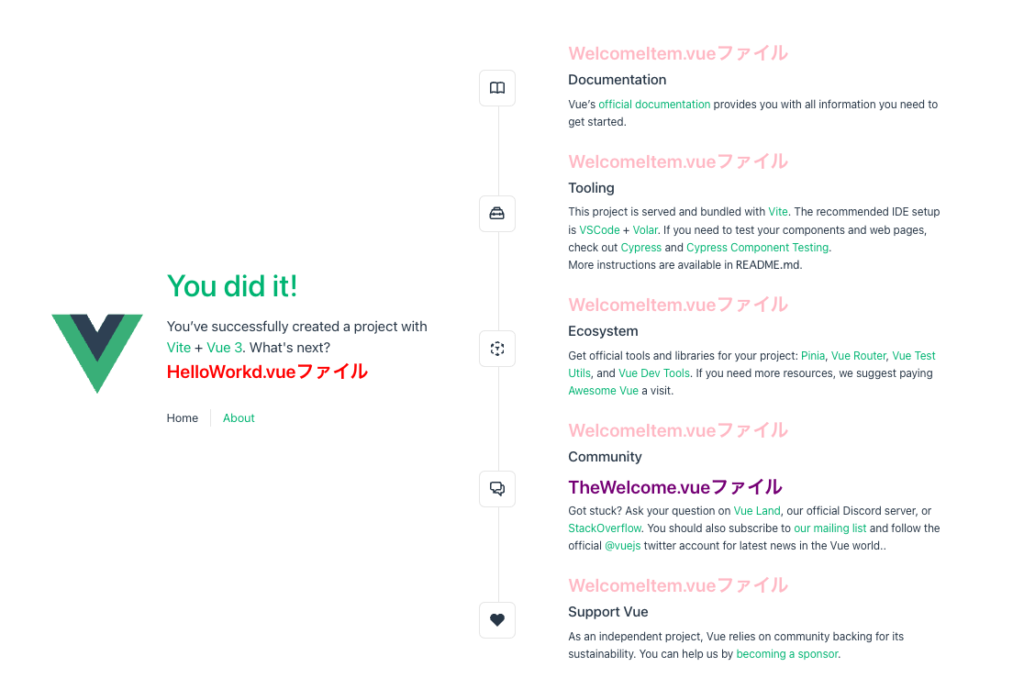
WelcomeItem.vue
WelcomeItem.vueは画面右側に表示されています。
TheWelcome.vueコンポーネントで使用しています。
<template>
  <div class="item">
    <i>
      <slot name="icon"></slot>
    </i>
    <div class="details">
      <h3>
        <p style="font-size: 25px; color: pink; font-weight: 600">WelcomeItem.vueファイル</p>
        <slot name="heading"></slot>
      </h3>
      <slot></slot>
    </div>
  </div>
</template>
router
Vue.js アプリケーション内でルーティングを管理するための構造を提供します。
ルーティングは、異なるページやビューに対応するために、URLとコンポーネントの対応関係を定義します。
Vue Routerを使用することで、シングルページアプリケーション(SPA)内でのナビゲーションやページ遷移をより効果的に扱うことができます。
import { createRouter, createWebHistory } from 'vue-router'
import HomeView from '../views/HomeView.vue'

const router = createRouter({
  history: createWebHistory(import.meta.env.BASE_URL),
  routes: [
    {
      path: '/',
      name: 'home',
      component: HomeView
    },
    {
      path: '/about',
      name: 'about',
      // route level code-splitting
      // this generates a separate chunk (About.[hash].js) for this route
      // which is lazy-loaded when the route is visited.
      component: () => import('../views/AboutView.vue')
    }
  ]
})

export default router
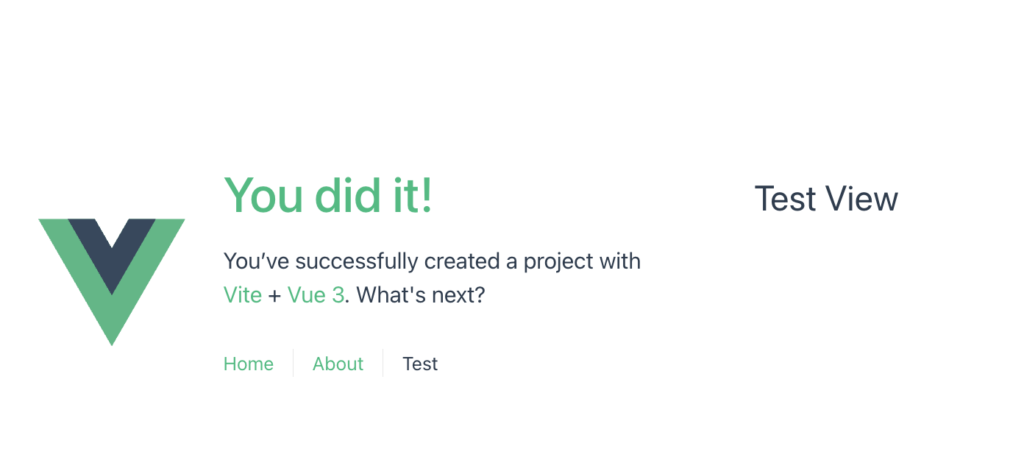
pathを変更するとリンクでのpathが変わります。
パスの追加
routesの配列内に追加してください。
path
pathプロパティは、URL 上のパスと対応します。このルートがどの URL パスにマッチするかを指定します。/aboutパスにアクセスすると、path: '/about'のルートでアクセスできます。
name
nameプロパティは、ルートに名前を付けるために使用されます。- 通常はルートを識別するために使用され、プログラム内で特定のルートにアクセスする際に便利です。
- 名前が設定されたルートは、
router-linkや$router.pushなどのメソッドで、名前を指定してアクセスすることができます。
component
componentプロパティは、ルートに対応する Vue コンポーネントを指定します。コンポーネントが表示されるのは、対応するパスにアクセスされたときです。componentには通常、コンポーネントを import している関数が設定され、動的なコード分割(code-splitting)や遅延読み込みが可能です。これにより、アプリケーションの初回ロード時のパフォーマンスが向上します。
import { createRouter, createWebHistory } from 'vue-router';
import HomeView from '../views/HomeView.vue';

const router = createRouter({
  history: createWebHistory(import.meta.env.BASE_URL),
  routes: [
    {
      path: '/',
      name: 'home',
      component: HomeView,
    },
    {
      path: '/about',
      name: 'about',
      component: () => import('../views/AboutView.vue'),
    },
    {
      path: '/test', // 新しいパス
      name: 'test',
      component: () => import('../views/TestView.vue'), // TestView.vue が存在しない場合は適切なコンポーネントに変更
    },
  ],
});

export default router;
スポンサードサーチ
views
Home.vue
「Home」ボタンを押下した場合に画面が切り替わります。
<script setup lang="ts">
import TheWelcome from '../components/TheWelcome.vue'
</script>

<template>
  <main>
    <TheWelcome />
  </main>
</template>
About.vue
「About」ボタンを押下した場合に画面が切り替わります。
<template>
  <div class="about">
    <h1>This is an about page</h1>
  </div>
</template>
App.vue
アプリケーションのメインコンポーネントです。
他のコンポーネントを取りまとめ、ルーティングのエントリーポイントとして使用さます。
<script setup lang="ts">
import { RouterLink, RouterView } from 'vue-router'
import HelloWorld from './components/HelloWorld.vue'
</script>

<template>
  <header>
    <img alt="Vue logo" class="logo" src="@/assets/logo.svg" width="125" height="125" />

    <div class="wrapper">
      <HelloWorld msg="You did it!" />

      <nav>
        <RouterLink to="/">Home</RouterLink>
        <RouterLink to="/about">About</RouterLink>
      </nav>
    </div>
  </header>

  <RouterView />
</template>
スポンサードサーチ
main.js
アプリケーションのエントリーポイントです。
Vueインスタンスを作成し、アプリケーションを初期化します。
app.mount('#app’)でidのappへマウントします。
import './assets/main.css'

import { createApp } from 'vue'
import App from './App.vue'
import router from './router'

const app = createApp(App)

app.use(router)

app.mount('#app')
tests
テストファイルがここに配置されます。
babel.config.js
Babelの設定ファイルです。
JavaScriptコードをトランスパイルする際の設定が含まれます。
package.json
プロジェクトの依存関係やスクリプトなどの情報が含まれるnpmの設定ファイルです。
こちらはvueというより、npmを使用したプロジェクトで覚えましょう。
{
  "name": "vue-project",
  "version": "0.0.0",
  "private": true,
  "scripts": {
    "dev": "vite",
    "build": "run-p type-check \"build-only {@}\" --",
    "preview": "vite preview",
    "build-only": "vite build",
    "type-check": "vue-tsc --noEmit -p tsconfig.app.json --composite false",
    "lint": "eslint . --ext .vue,.js,.jsx,.cjs,.mjs,.ts,.tsx,.cts,.mts --fix --ignore-path .gitignore",
    "format": "prettier --write src/"
  },
  "dependencies": {
    "vue": "^3.3.4",
    "vue-router": "^4.2.5"
  },
  "devDependencies": {
    "@rushstack/eslint-patch": "^1.3.3",
    "@tsconfig/node18": "^18.2.2",
    "@types/node": "^18.18.5",
    "@vitejs/plugin-vue": "^4.4.0",
    "@vue/eslint-config-prettier": "^8.0.0",
    "@vue/eslint-config-typescript": "^12.0.0",
    "@vue/tsconfig": "^0.4.0",
    "eslint": "^8.49.0",
    "eslint-plugin-vue": "^9.17.0",
    "npm-run-all2": "^6.1.1",
    "prettier": "^3.0.3",
    "typescript": "~5.2.0",
    "vite": "^4.4.11",
    "vue-tsc": "^1.8.19"
  }
}
README.md
こちらも基本的なことですが、プロジェクトに関するドキュメンテーションや説明が含まれるマークダウンファイルです。
説明を書きたい場合はここに記述しましょう。
vue.config.js
Vue CLIの設定ファイルです。
ビルドや開発サーバーの設定が可能です。
npm create vue@latest コマンドで生成されるデフォルトのVue.jsプロジェクトの一般的なファイル構造です。
各ディレクトリやファイルは、Vue.jsのベストプラクティスに基づいて配置されています。
import { fileURLToPath, URL } from 'node:url'

import { defineConfig } from 'vite'
import vue from '@vitejs/plugin-vue'

// https://vitejs.dev/config/
export default defineConfig({
  plugins: [
    vue(),
  ],
  resolve: {
    alias: {
      '@': fileURLToPath(new URL('./src', import.meta.url))
    }
  }
})

 https://god48.com/vite-server-change